

You’re halfway through a microblading session when you notice it—tiny droplets of pigment scattered across your client’s skin, far beyond the crisp hairstrokes you intended. Your heart sinks as you realize the splattering has compromised your design, and your client is watching your expression in the mirror. This scenario plays out daily for new PMU practitioners, and pigment splattering remains one of the most frustrating technical challenges in the industry. It disrupts precision, wastes expensive pigment, and can erode the trust you’re working so hard to build with clients.
The good news? Splattering isn’t inevitable. With the right equipment and technique, you can eliminate this problem almost entirely. The Biomaser tattoo machine has emerged as a go-to solution for beginners specifically because it offers the stability and control needed to keep pigment exactly where it belongs. In this article, we’ll break down why splattering happens, how Biomaser’s engineering addresses the root causes, and the specific techniques—including the short stroke method—that will help you deliver clean, professional results from your earliest sessions.
Understanding Pigment Splattering: The Bane of New PMU Artists
Pigment splattering occurs when ink disperses beyond the intended application area during a PMU procedure, creating irregular dots, blurred lines, or a messy halo effect around your work. Rather than crisp, defined strokes or smooth shading, you’re left with an unpredictable scatter pattern that undermines even the most carefully mapped design.
Several factors trigger this problem. Excessive machine vibration causes the needle to bounce unpredictably against the skin surface, flicking pigment outward. Running your machine at too high a speed creates a whipping effect that launches droplets away from the entry point. Improper needle depth—particularly going too shallow—means pigment sits on the surface rather than being deposited into the dermis, making it vulnerable to dispersal with each subsequent pass. Inconsistent pigment viscosity and overloaded needle cartridges compound these issues further.
The consequences extend well beyond aesthetics. Scattered pigment leads to poor retention since ink deposited at inconsistent depths heals unevenly, often fading in patches. Clients notice the mess during their session, which immediately undermines their confidence in your skill. During healing, splattering can cause unexpected discoloration in surrounding skin areas, leading to dissatisfied clients and negative reviews. For new practitioners building a portfolio and reputation, every session counts—and splattering transforms what should be a showcase piece into a cautionary tale. Addressing this issue early in your career establishes the foundation for consistent, trustworthy results that generate referrals.
Biomaser PMU Machine: Engineered for Precision and Control
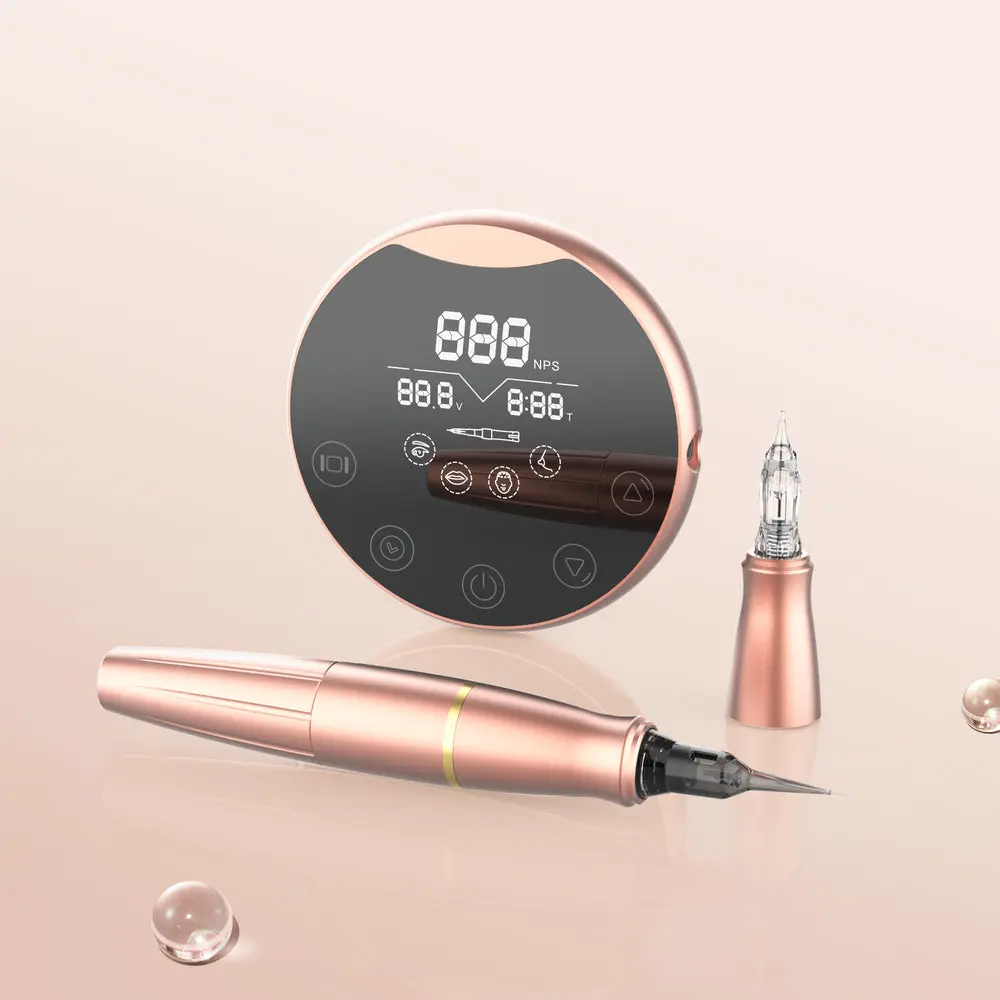
When you’re new to permanent makeup, your machine can either be your greatest ally or your biggest source of frustration. The Biomaser tattoo machine was developed with beginners specifically in mind, offering a level of stability and predictability that more complex professional devices often lack. Rather than overwhelming new artists with dozens of settings and configurations, Biomaser focuses on delivering consistent needle movement that keeps pigment where you place it—not scattered across your client’s face. This philosophy of controlled simplicity makes it an increasingly popular choice among PMU training academies and self-taught practitioners alike.
Key Features That Minimize Pigment Splattering
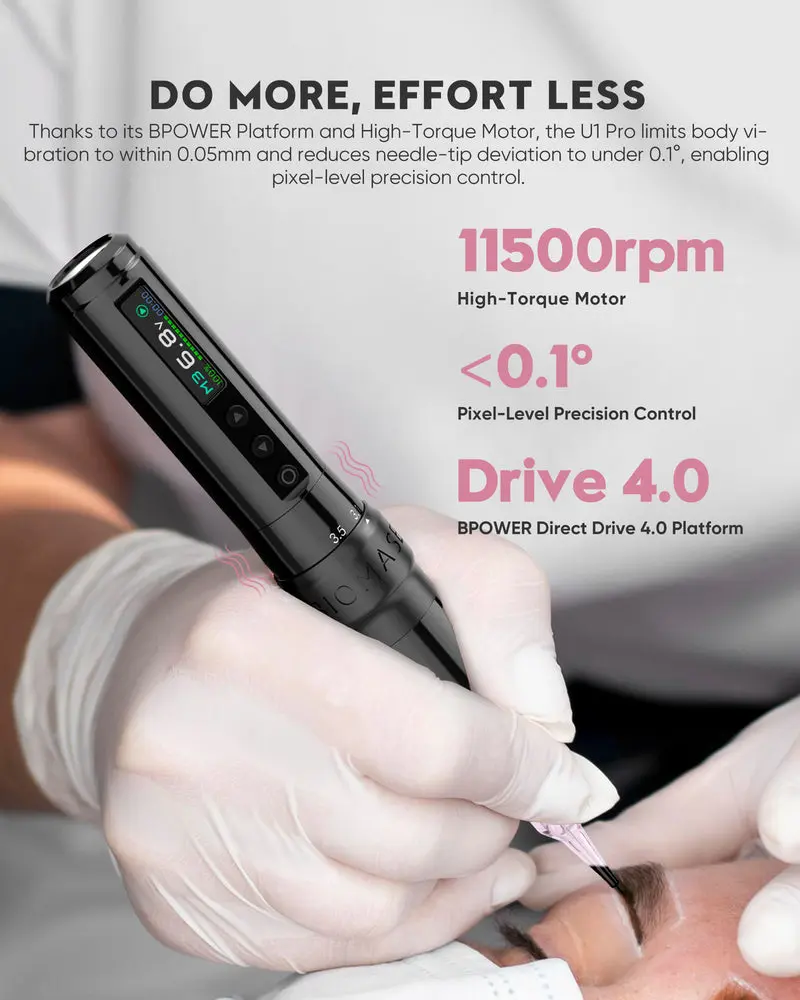
The foundation of Biomaser’s anti-splatter performance lies in its stable motor operation. Unlike cheaper machines that produce irregular vibrations at certain speed ranges, Biomaser’s motor maintains consistent torque throughout its RPM range, eliminating the erratic needle bounce that flings pigment sideways. The adjustable stroke length allows you to dial in precisely how far the needle extends—shorter strokes mean less momentum and dramatically reduced splatter risk during delicate procedures like hairstrokes. The ergonomic pen-style design distributes weight evenly, reducing hand fatigue that causes the micro-tremors responsible for unintended pigment dispersal during longer sessions. Together, these elements create a machine that responds predictably to your movements rather than fighting against them.
Why Biomaser is Ideal for New PMU Practitioners
Beyond hardware specs, Biomaser’s intuitive controls mean you spend less time troubleshooting settings and more time developing your technique. The learning curve is notably gentle—most beginners report feeling comfortable with speed and depth adjustments within their first few practice sessions. The machine’s reliability also matters enormously when you’re still building confidence; knowing your equipment won’t behave unpredictably lets you focus entirely on hand control and artistry rather than compensating for mechanical inconsistencies.
Mastering the Short Stroke Technique for Flawless Results
The short stroke technique is exactly what it sounds like—reducing the needle’s travel distance so it penetrates just enough to deposit pigment into the upper dermis without the excess momentum that causes splattering. When your needle extends only 1.0 to 1.5 millimeters beyond the cartridge tip, there’s simply less force available to fling pigment outward upon skin contact. This controlled, shallow penetration is particularly critical for hairstrokes in microblading and powder brow work, where precision defines the quality of your results.
To execute the short stroke technique effectively, start by adjusting your Biomaser’s stroke length to its shorter settings. Position your hand so that your ring finger and pinky rest firmly on the client’s skin, creating a stable anchor point that moves with your working hand. Hold the machine at a 45 to 60-degree angle relative to the skin surface—this ensures the needle enters at an optimal trajectory rather than hitting flat and bouncing pigment sideways. Keep your speed moderate; rushing creates the same whipping effect as an overly long stroke. Each pass should feel deliberate and measured, with consistent pressure throughout the entire length of your stroke.
Building proficiency requires structured practice. Begin on latex practice skin, drawing rows of parallel lines at identical lengths until your muscle memory locks in the correct pressure and speed. Pay attention to sound—a properly executed short stroke produces a soft, consistent hum rather than an aggressive buzzing or irregular tapping. Once your lines appear uniform on practice skin, move to pig skin or fruit skin to simulate real tissue resistance. Track your progress by photographing each practice session and comparing line crispness over time. Most practitioners notice significant improvement within two to three weeks of daily fifteen-minute practice sessions. The key is patience; rushing to work on clients before your short stroke technique is automatic invites splattering under the added pressure of a live session.
Choosing the Right Biomaser Machine: A Guide for New Practitioners
Selecting the right Biomaser model isn’t just about budget—it’s about matching your machine to the specific procedures you’ll perform most often. A machine optimized for microblading hairstrokes requires different characteristics than one designed for lip blush or eyeliner work. Taking time to evaluate your needs before purchasing prevents the frustration of fighting against equipment that wasn’t designed for your primary technique, which directly contributes to splattering and inconsistent results.
Factors to Consider Based on Your PMU Techniques
Motor power determines how consistently your needle moves through varying skin densities—look for machines with sufficient torque to maintain steady RPM without stalling on thicker skin areas. Needle compatibility matters because not all cartridge systems fit every machine; confirm your chosen Biomaser accepts the cartridge configurations you need for your procedures. Ease of maintenance plays a direct role in splatter prevention, since machines that are simple to disassemble and clean maintain their precision longer. Consider whether you need variable stroke lengths for multiple techniques or whether a fixed short-stroke setup suits your focused practice area.
Top Biomaser Models for Beginners
Biomaser offers several entry-level machines that balance affordability with professional-grade performance. Their pen-style rotary machines are particularly popular among new practitioners because they combine lightweight handling with the stable motor operation needed to prevent splattering. When choosing between models, prioritize those with clearly marked adjustment dials and smooth speed transitions rather than abrupt jumps between settings. Read reviews from other beginners working in your specific PMU niche, and consider starting with a versatile all-rounder if you haven’t yet specialized in one technique.
Practical Steps to Avoid Pigment Splattering with Your Biomaser
Knowing why splattering happens and understanding your machine’s capabilities only matters if you translate that knowledge into a repeatable workflow. The following three-phase approach gives you a concrete system to follow before, during, and after every session—turning splatter prevention from something you hope for into something you engineer deliberately.
Step 1: Pre-Procedure Machine Calibration and Setup
Before any client sits in your chair, run your Biomaser on practice skin for at least two minutes. This warm-up reveals any inconsistencies in needle movement or motor behavior that could cause splattering during the actual procedure. Confirm your needle cartridge is securely seated with no lateral wobble—even slight looseness amplifies vibration and sends pigment flying. Check your pigment consistency by loading the needle and observing how ink clings to the tip; if it drips freely or appears too watery, adjust with thickening solution or switch to a fresh bottle. Set your stroke length and speed to conservative starting points, knowing you can increase gradually once you’ve confirmed clean delivery on the test surface.
Step 2: During the Procedure: Techniques for Control
Grip your Biomaser with relaxed fingers—a death grip creates tension that translates into jerky, splatter-prone movements. Maintain a consistent 45 to 60-degree angle and let the machine’s weight do most of the work rather than pressing downward. Keep your speed at roughly 70 percent of maximum; the Biomaser’s stable motor delivers excellent pigment deposit at moderate RPMs without the whipping action that higher speeds produce. Wipe excess pigment frequently so buildup on the needle tip doesn’t get flung outward on subsequent passes. If you notice any irregularity in sound or feel, stop immediately and inspect your cartridge rather than pushing through.
Step 3: Post-Procedure Maintenance and Troubleshooting
After each session, disassemble your Biomaser according to the manufacturer’s instructions and clean all accessible components thoroughly. Dried pigment residue inside the grip or around the cam mechanism creates friction that degrades smooth needle movement over time, gradually reintroducing the vibration issues that cause splattering. Store your machine in its protective case, positioned upright to prevent internal lubricant from pooling unevenly. Every ten sessions, inspect your motor’s responsiveness by running through the full speed range and listening for any grinding or hesitation—catching mechanical wear early prevents it from sabotaging your next client appointment.
Building a Splatter-Free PMU Practice with the Right Tools and Technique
Pigment splattering doesn’t have to define your early career in permanent makeup. By understanding the mechanical and technical causes—excessive vibration, improper needle depth, and uncontrolled speed—you gain the power to systematically eliminate each one. The Biomaser tattoo machine gives new practitioners a significant advantage in this fight, offering stable motor performance, adjustable stroke lengths, and ergonomic design that work together to keep pigment precisely where you intend it. Paired with the short stroke technique and a disciplined pre-procedure, during-procedure, and post-procedure workflow, you have everything needed to deliver clean, professional results that build client trust and generate referrals.
Remember that consistency comes from the combination of quality equipment and deliberate practice. Invest in your machine, commit to daily technique drills, and approach each session with a calibration mindset rather than hoping for the best. The practitioners who master splatter prevention early are the ones who build thriving businesses fastest—because every clean result becomes a portfolio piece, every satisfied client becomes an advocate, and every session reinforces the confidence that separates professionals from beginners. Start today, practice with intention, and let your results speak for themselves.