

Modern residential architecture heavily highlights clean lines, minimalist finishes, and open views. While upgrading a deck, patio, or interior staircase with glass or cable railings was once considered a job exclusively for specialized contractors, innovative product engineering has changed the industry landscape.
Today, ambitious homeowners can easily take on a DIY railing installation. Manufacturers have redesigned components to eliminate the need for specialized welding, complex field fabrication, or industrial machinery. By choosing a user-friendly, pre-engineered kit, you can bypass expensive subcontractor labor rates while significantly increasing your property’s curb appeal and long-term value. As an industry-leading glass railing systems supplier, URailing manufactures modern, structural component kits engineered for straightforward home assembly. This guide provides the practical tips and design steps needed to complete your project with professional results.
Why Modern Railing Systems are Ideal for DIY Projects
Historically, installing metal or glass balustrades required a professional metal fabricator to weld, polish, and custom-cut components on-site. Modern modular systems have completely removed these barriers.
- Component Interlocking: Posts come pre-drilled and tapped from the factory, allowing hardware to bolt together smoothly using basic hex keys and standard drivers.
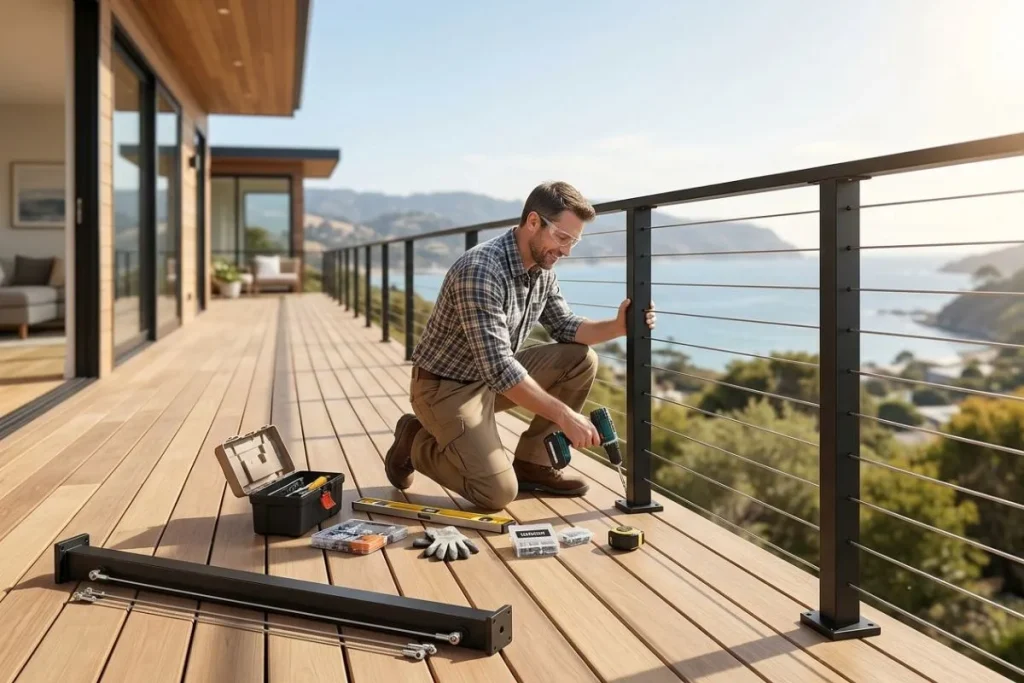
- No Field Welding Required: Mechanical compression fittings and sleeve connectors eliminate the need for dangerous welding torches on your wooden deck.
- Pre-Assembled Posts: Vertical posts frequently arrive with pre-mounted base plates, glass brackets, or cable pass-through holes already aligned.
To understand the core differences between the main framing metals before ordering your materials, review our detailed guide on aluminum vs stainless steel railing posts systems.
Essential Tool Checklist for Homeowners
Before unboxing your components, gather these standard tools to ensure a smooth, uninterrupted installation:
- Cordless Impact Driver & Drill: For driving heavy lag screws into your structural wood framing or concrete slab.
- Digital Torpedo Level: Essential for ensuring every vertical post is perfectly plumb.
- Chalk Line & Tape Measure: For laying out consistent post spacing across the deck perimeter.
- Safety Gear: Always wear impact-resistant safety glasses and heavy work gloves when handling glass panels or tensioning stainless steel wires.
Step-by-Step DIY Installation Principles
While specific steps vary by product line, following these universal layout guidelines will prevent common installation mistakes:
1. Preparing the Structural Foundation
A railing system is only as solid as the surface underneath it. If you are mounting to a wooden deck, you must add structural wood blocking underneath the fascia boards where the posts will sit. Bolting posts into thin deck surface boards alone will cause the system to sag and fail code inspections.
2. Snapping the Layout Line
Use a chalk line to snap an exact offset boundary line roughly 3 inches inward from the outer deck edge. Mark your post centerlines along this line, keeping spacing uniform according to the manufacturer’s manual.
[Outer Deck Fascia Edge]
   │  (3-Inch Safe Offset Gap)
   └───> [Snapped Chalk Line] ──> [Post 1] ─── [Post 2] ─── [Post 3]
3. Anchoring the Posts
Set your first corner post, drop in your structural anchor bolts, and use plastic shims under the base plate to make sure the post is perfectly vertical before tightening the bolts completely.
Selecting Your Infill: Glass Panels vs. Cable Wires
Homeowners generally choose between two primary minimalist infill options for DIY setups:
Cable Railing Kits
Cable systems are incredibly popular for DIY projects because they are lightweight and forgiving to install. Multi-strand marine-grade stainless steel cables pass through pre-drilled holes in the posts and lock down using simple threaded turnbuckles. To review options for these streamlined wire setups, check out our guide on matte black cable railing systems.
Glass Panel Systems
For maximum visibility and an upscale feel, frameless glass railing systems offer a stunning solution. Homeowners can use heavy-duty glass clamps & connectors to mount panels onto standard posts without needing custom glass fabrication.
| Infill Type | DIY Skill Level Required | Cleaning & Upkeep | Visual Aesthetic |
| Cable Infill | Beginner to Intermediate | Very Low (Occasional tension check) | Modern / Industrial |
| Glass Panels | Intermediate (Heavy lifting) | Moderate (Prone to smudges) | Ultra-Premium / Luxury |
To get a better look at how these clamp systems work mechanically without posts, read our article detailing what are glass clamp systems. For outdoor pool installations, replacing standard brackets with specialized glass railing spigots for pool fencing provides a sturdy base that won’t rust from chlorine exposure.
Handrail Components and Finishing Touches
Once your structural posts are securely anchored, you can attach your running top rails and structural handrails to tie the look together.
- Adjustable Connections: Using versatile handrail brackets or heavy-duty baluster brackets allows you to mount top rails at the exact angle needed for staircases.
- Custom Stair Support: If you are tackling an interior stair renovation, reviewing our guide on the best types of baluster brackets for indoor residential stair railings will help you choose the right hardware layouts. For classic architectural definitions, you can consult historical data on traditional baluster configurations.
- Removable Hardwear Options: If you need an adjustable handrail setup, using removable handrail brackets for glass railing systems allows you to detach sections later for moving large furniture up narrow staircases.
Contemporary Hardware Accents
You can further customize your DIY project by choosing premium matte finishes and clean structural connectors:
- Dark Color Trends: Adding components like a matte black stainless steel handrail stair pipe connector tube elbow or a matte black stainless steel glass handrail cap railing creates a bold, modern contrast against natural wood decking.
- Secure Tube Support: You can use heavy-duty stainless steel round tube handrail brackets to ensure a rock-solid connection between your metal handrail tubes and the supporting walls.
- Geometric Profiles: For a sharp, industrial look, incorporating a square stainless steel glass staircase railing offers clean lines that are easy to align during DIY assembly.
Critical Safety and Building Code Rules
To ensure your DIY project passes local safety inspections, keep these three strict code requirements in mind:
- The 4-Inch Sphere Rule: No opening anywhere in your finished railing system can allow a 4-inch sphere to pass through. This protects toddlers and pets from slipping through the gaps.
- Minimum Guardrail Height: Most residential codes mandate a minimum railing height of 36 inches for decks and balconies, while commercial properties typically require 42 inches.
- Handrail Grip Requirements: Staircase handrails must feature an approved graspable profile (typically round or oval tubes with a diameter between 1.25 and 2 inches) so users can maintain a solid grip.
To review our automated production setups and quality testing procedures, visit our global UNIKIM Made-In-China portal or watch step-by-step video installation guides on our official UNIKIM YouTube channel.
For custom material estimates, engineering advice, or help planning your layout, please reach out to the URailing support team directly.