
Collect some findings; these are such things as jump rings, ear wires, headpins, and eye pins. In expansion, you need various types of chains to use on your jewelry.
You will also need the right tools to make the jewelry. You will need some small pliers with a round nose. You may have to buy these at a craft shop, as the ones typically sold at a hardware store are too large. Some use chain nose pliers to grip a jump ring or the wire. These pliers are flat on the inside but the outside is round. You will need something to cut your wires with such as wire cutters.
You will also need a jump ring cutting jig a jig is merely a board that has pegs sticking out of it. You will use the pegs to shape the wire into the form you want and to prevent it from losing its shape.
You can get started now that you have everything ready. With this method, you can make an anklet necklace or bracelet. You will start with a wire and loop it at the end with your pliers. String your beads onto the wire, then cut the wire leaving just enough room to make another loop. Make your final loop and put your chain on the end using a jump ring or attach it directly to the loop. Put the clasp on using jump rings to hold it to the loops on each end of the piece.
It is easy to make a pair of earrings that dangle. Begin with a headpin and decorate it with any combination of beads you wish. Bend the bottom of the headpin with your pliers and then loop it. Hang a finding or a wire to the loop you have made an earring.
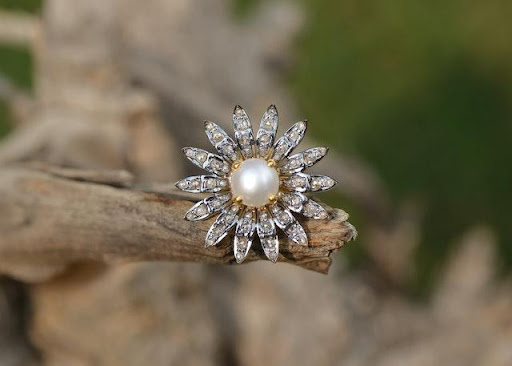
Here are some practical tips when you are shopping for that perfect ring:
1. Know your preferred shape. Radiant cuts are generally rectangular. However, with increasing demand, there are bound to be some variations of the original shape. Radiant cut stones can appear as the traditional rectangle to a perfect square. The rectangle shape is excellent for those who want the fusion of jump ring cutting jig & round-cut brilliance. The square shape radiantly closely resembles a princess cut with the prongs covering its cropped corners.
2. Evaluate the clarity of the diamonds. Clarity measures the degree of the stone’s natural flaws like blemishes and inclusions. Sure, there are universal clarity grades that professional jewelry follow However evaluating clarity can be pretty much subjective as well. Every person looking to buy diamonds has their standard of clarity. While some may be content with a diamond with inclusion, as long as it is not visible, the same may not be true for you. In this case, you may insist on a technically graded and flawless stone.
3. Consider the embellishments. Side stones can enhance the beauty of a radiant cut center stone. The most popularly used side stones for this purpose are baguettes. Although, radiant cut stones can hold on their own as a solitaire also, you need to consider whether you wish to set it on white gold or platinum or any other choices you will be given.
The ring, in some instances, is built from one piece of wood. However, this is quite a costly venture, relative to the total cost of the yurt. Other wooden rings use a layered approach, sandwiching a layer of OSB between pieces of dimensional lumber, or the reverse. Other rings are constructed from metal, or metal and wood combinations, while a few are built of polymers. Since most yurt-dwellers have a spirit of self-adequacy, I suggest making the ring entirely from dimensional timber, in layers.
Modern Mongolian
For this piece of your modern Mongolian yurt, you will need fourteen eight-foot lengths of one-by-six spruce, fir or pine planks. As well, one quart of carpenters glue and one hundred eighty-two-inch construction screws complete your parts inventory
Begin by cutting all of the eight-foot lengths of planking into four-foot lengths. Lay them side by side, using nine pieces on the first layer to form a near-square. Due to the actual width of a six-inch plank (5.5 inches), the total width should be 49.5 inches – slightly wider than the length. At this point, this is not important. Next, connect these boards jointly temporarily, using one of the four-foot sizes tightened across the center point of the nine councils. Apply a liberal coat of carpenters glue to the surface.
For the next layer,
Lay the second set of nine boards perpendicular to the first layer, with the leading edge flush with one side of the 49.5-inch width. This will leave 1.5 inches of the first layer exposed. Later, that surplus will be removed. Put one screw at each end of the nine boards of the second layer. Since there is no lateral security using single sets of screws, you now can square the assembly, using a standard two-foot square holding the setup in place, set one screw every six inches alternating from one side of each board to the other. The screws will protrude beyond the bottom side of the first layer at this time.
Flip the two layers over,
Applying a layer of carpenters glue to the underside of the first layer lay the third layer of boards perpendicular to this first layer, and attach exactly as you did with the second layer. Allow the assembly to dry, then use a saw to remove the 1.5 inches of excess width on the second layer.