
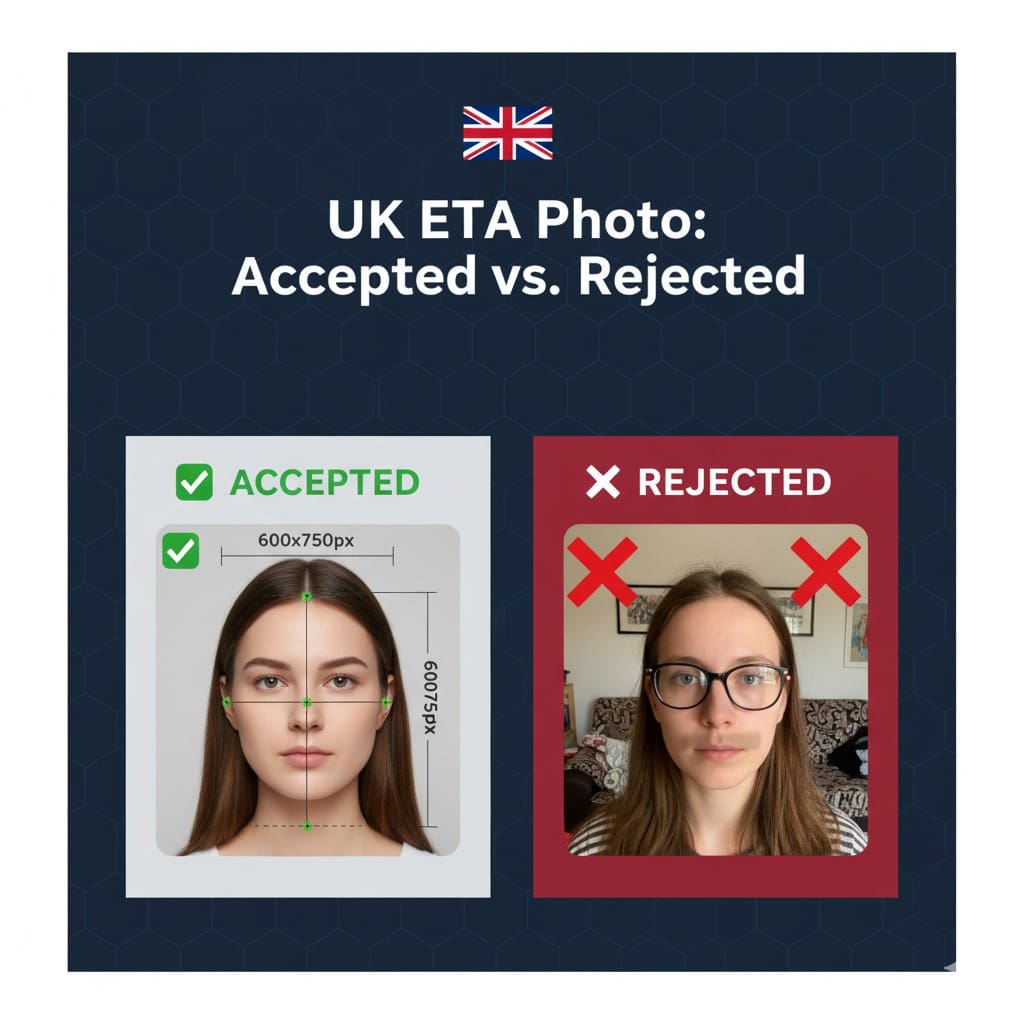
Planning a trip to the UK? If you’re from one of the countries requiring an Electronic Travel Authorization (ETA), getting your photo right is crucial. A single mistake—whether it’s the wrong background color, incorrect dimensions, or simply wearing glasses—can delay your application or result in outright rejection.
Don’t worry, though. This comprehensive guide walks you through every specification, requirement, and best practice for UK ETA photos. Whether you’re taking the photo yourself at home or heading to a professional service, you’ll know exactly what’s needed to get approved on your first try.
Let’s dive into everything you need to know about UK ETA photo requirements.
What is the UK ETA and Why Photo Requirements Matter
The UK Electronic Travel Authorization (ETA) is a digital travel permission required for visa-exempt nationals visiting the United Kingdom. Think of it as similar to the US ESTA system—it’s not a visa, but it’s mandatory for entry.
Here’s why your photo matters so much: The UK uses advanced biometric facial recognition technology at border control. Your ETA photo gets matched against your face when you arrive, helping immigration officers verify your identity quickly and securely. If your photo doesn’t meet the strict technical specifications, the system can’t process it properly, leading to application rejection.
The good news? Once you understand the requirements, getting it right is straightforward.
Image Suggestion: Simple flowchart showing: “Submit Compliant Photo → Biometric Processing → ETA Approved → Smooth UK Entry” with icons for each stage.
Official UK ETA Photo Size and Technical Specifications
Let’s start with the technical details. Your UK ETA photo must meet these exact specifications:
Digital Dimensions:
- Pixel size: 600 x 750 pixels (width x height)
- Resolution: 300 DPI minimum
- Aspect ratio: 4:5
- File format: JPEG (.jpg) only
- File size: Between 50KB and 10MB
- Color depth: 24-bit color
These aren’t arbitrary numbers—they’re optimized for the UK’s facial recognition systems. Too small, and the image lacks detail. Too large, and it won’t upload properly.
Head Positioning Requirements:
Your head should occupy 70-80% of the photo frame, measured from chin to crown. This means your face needs to be clearly visible and properly centered, with a small amount of space above your head and below your chin. Both eyes should be on the same horizontal plane, and you should be looking directly at the camera.
Background Requirements:
This is where many applications fail. Your background must be:
- Plain white or light grey (no other colors)
- Completely uniform with no patterns, textures, or objects
- Shadow-free—no dark spots or uneven lighting on the wall behind you
- Consistent across the entire frame
A simple white wall works perfectly. Avoid cream, beige, or off-white backgrounds, as these often cause rejection.
Image Suggestion: Technical specifications infographic with a sample photo in the center, surrounded by callouts pointing to specific elements: “600x750px dimensions,” “300 DPI resolution,” “JPEG format,” “70-80% head height” with visual measurement lines.
Appearance and Facial Expression Guidelines
Your appearance in the photo is just as important as the technical specifications. The UK Home Office has strict guidelines designed to ensure accurate biometric matching.
Facial Expression:
- Maintain a neutral expression with your mouth closed
- Don’t smile, frown, or make any other expression
- Look directly at the camera with both eyes open and visible
- Keep your face forward—no tilting or turning to the side
Why so serious? Facial recognition algorithms work best with neutral expressions because they create consistent facial geometry. A big smile changes the shape of your face, potentially causing matching issues at the border.
Eyewear Rules:
Here’s a critical point: You cannot wear glasses in your UK ETA photo. This is a common rejection reason because many people assume passport-style rules apply.
The only exception is if you have a medical certificate stating that glasses cannot be removed for health reasons. Sunglasses and tinted lenses are never permitted, regardless of medical conditions. If you wear contact lenses, those are perfectly fine and don’t need to be removed.
Headwear and Religious Exemptions:
Generally, you must not wear hats or head coverings. However, religious headwear like hijabs, turbans, kippah, or other faith-based coverings are permitted—provided your face is fully visible from chin to forehead and the headwear doesn’t cast shadows on your face.
Image Suggestion: Grid comparison showing four photos: 1) ✅ Correct – neutral expression, no glasses; 2) ❌ Incorrect – smiling; 3) ❌ Incorrect – wearing regular glasses; 4) ✅ Correct – religious headwear with face fully visible.
Clothing and Lighting Best Practices
What to Wear:
While there’s no strict dress code, your clothing choices can affect photo acceptance:
- Avoid white or very light-colored tops (they blend with the background)
- Choose medium to dark colors for better contrast
- Skip busy patterns or graphics
- Don’t wear uniforms unless you’re military personnel submitting official documentation
Dark blue, black, grey, or any jewel tones work beautifully against a white background.
Proper Lighting Setup:
Good lighting makes the difference between a professional-looking photo and a rejected application. Follow these guidelines:
- Use soft, even lighting from the front—harsh overhead lights create unflattering shadows under your nose and chin
- Natural daylight works excellently if you’re near a window, but avoid direct sunlight which causes squinting and harsh shadows
- Position yourself 2-3 feet from the background to prevent shadow casting on the wall
- Ensure your face is evenly lit with no dark spots or bright spots
The goal is to see all your facial features clearly with natural skin tones—no red-eye, glare, or washed-out appearance.
Image Suggestion: Overhead diagram showing optimal home photo setup: subject positioned 2-3 feet from white wall, camera 4-5 feet away at eye level, light sources positioned at 45-degree angles in front of subject.
Common Mistakes That Lead to Photo Rejection
Learning from others’ mistakes can save you time and frustration. Here are the top rejection reasons:
1. Wearing Glasses (30% of rejections) Even clear prescription glasses often cause glare or reflections that interfere with facial recognition.
2. Incorrect Background (25% of rejections) Shadows, colored walls, patterns, or other people/objects visible in frame.
3. Wrong Technical Specifications (20% of rejections) Incorrect dimensions, low resolution, wrong file format, or oversized files.
4. Poor Lighting and Shadows (15% of rejections) Dark shadows on face or background, red-eye, or overexposed bright spots.
5. Outdated Photos (10% of rejections) Photos older than 6 months that no longer accurately represent your current appearance.
Image Suggestion: Infographic showing “Top 5 UK ETA Photo Rejection Reasons” with small example photos demonstrating each error, percentage statistics, and quick fix solutions for each.
How to Take Your UK ETA Photo at Home
Taking a compliant photo at home is absolutely possible with modern smartphone cameras. Here’s your step-by-step guide:
Equipment You’ll Need:
- Smartphone with 12MP+ camera or digital camera
- Plain white wall or white backdrop
- Good lighting (natural daylight or soft lamp light)
- Tripod or stable surface (books, shelf)
- Self-timer function or a friend to help
Step-by-Step Process:
- Set up your space: Find a plain white wall and position yourself 2-3 feet away from it.
- Position your camera: Place it 4-5 feet away at your eye level. Use a tripod or stack books to achieve the right height.
- Check your lighting: Make sure your face is evenly lit with no harsh shadows. Natural light from a window works great.
- Frame yourself correctly: Your head should fill 70-80% of the frame. Use your camera’s grid feature to center yourself.
- Set the timer: Use a 5-10 second timer to avoid camera shake and ensure you’re looking directly at the lens.
- Take multiple shots: Don’t stop at one—take 10-15 photos so you can choose the best one.
- Review carefully: Zoom in on your phone to check sharpness, check the background for shadows, and verify your expression is neutral.
Helpful Apps and Tools:
Several apps can help ensure compliance:
- Passport Photo Online (iOS/Android) – Guides you through proper positioning
- ID Photo Application – Auto-crops and formats to specifications
- Photo Resizer – Adjusts dimensions and file size
For additional guidance and resources, visit https://etauk.ae/ where you’ll find comprehensive application support and photo requirement checkers.
Image Suggestion: Six-panel step-by-step visual guide with numbered photos showing: 1) Setting up white wall, 2) Positioning camera on tripod, 3) Checking lighting, 4) Using timer, 5) Reviewing photos, 6) Final approved photo.
Professional Photo Services: When to Use Them
If you’re uncertain about taking your own photo, professional services offer guaranteed compliance. Most pharmacies, post offices, and photo studios provide passport/visa photo services for £10-20.
Benefits of Professional Services:
- Guaranteed technical compliance
- Professional lighting and equipment
- Expert positioning and framing
- Instant prints and digital copies
- Peace of mind
When DIY Works Best:
- You have a quality smartphone camera (12MP+)
- Good natural lighting available at home
- Plain white wall or backdrop
- Comfortable with technology
- Want to save money (free vs. £15)
Both approaches work perfectly fine—choose based on your comfort level and resources.
Image Suggestion: Comparison table graphic with two columns: “Professional Service” vs “DIY at Home” showing pros, cons, costs, and ideal user profile for each option.
Uploading Your Photo and What Happens Next
Once you have your perfect photo, you’ll upload it through the UK ETA application portal. The system performs immediate automated checks for:
- Correct file format and size
- Dimension compliance
- Basic quality standards
- Face detection
If your photo passes these automated checks, it moves to manual review by immigration officers who verify biometric compliance and overall quality. The entire UK ETA application typically processes within 72 hours, though most are completed within 24 hours.
If your photo is rejected, you’ll receive specific feedback explaining why. You can then correct the issue and resubmit without paying additional fees.
For step-by-step application guidance and photo troubleshooting support, https://etauk.ae/ provides comprehensive resources to help you get it right the first time.
Quick Reference Checklist
Before submitting your photo, verify it meets ALL these requirements:
✅ Photo is exactly 600 x 750 pixels
✅ Resolution is 300 DPI or higher
✅ File format is JPEG (.jpg)
✅ File size between 50KB – 10MB
✅ Plain white or light grey background
✅ Photo taken within last 6 months
✅ No glasses or sunglasses worn
✅ Neutral facial expression, mouth closed
✅ Eyes open and clearly visible
✅ Face centered and looking directly at camera
✅ Head occupies 70-80% of frame
✅ No shadows on face or background
✅ No filters or heavy editing applied
✅ Appropriate clothing (contrasting with background)
✅ Religious headwear (if applicable) doesn’t obscure face
Image Suggestion: Downloadable, printer-friendly checklist card with checkboxes, ETAUK.ae branding, and a QR code linking to the full guide.
Conclusion: Get Your UK ETA Photo Right the First Time
Getting your UK ETA photo approved doesn’t have to be complicated. By following the technical specifications—600 x 750 pixels, white background, neutral expression, no glasses—and paying attention to lighting and positioning, you’ll sail through the application process.
Remember these key points:
- Technical specs matter: exact dimensions, JPEG format, proper file size
- Background must be plain white with no shadows
- Remove all eyewear unless medically necessary
- Take the photo within 6 months of applying
- Review carefully before uploading
Whether you choose to take your photo at home or use a professional service, the most important thing is ensuring every specification is met. One small oversight can mean delays or rejection.
Ready to start your UK ETA application with confidence? Visit https://etauk.ae/ for comprehensive guidance, application support, and expert resources to make your UK travel authorization process smooth and stress-free.
Frequently Asked Questions (FAQs)
Q: Can I use my passport photo for my UK ETA application?
A: You can potentially use your passport photo if it meets all UK ETA specifications and was taken within the last 6 months. However, verify that it’s exactly 600 x 750 pixels, has a plain white background, and meets all technical requirements. If your passport photo is older than 6 months or uses different dimensions, you’ll need a new photo specifically for your ETA application.
Q: Why can’t I wear glasses in my UK ETA photo?
A: Glasses are prohibited because they often cause glare, reflections, or shadows that interfere with facial recognition technology used at UK borders. The biometric systems need to clearly see your eyes and facial features for accurate identity verification. The only exception is if you have a medical certificate stating glasses cannot be removed for health reasons. Contact lenses are acceptable and don’t need to be removed.
Q: What’s the most common reason UK ETA photos get rejected?
A: The most common rejection reason is wearing glasses (approximately 30% of rejections), followed by incorrect background color or shadows (25%), and wrong technical specifications like dimensions or file format (20%). To avoid rejection, carefully follow all requirements, use a plain white background, remove eyewear, ensure proper lighting, and verify your photo is 600 x 750 pixels in JPEG format before uploading.
Q: How recent does my UK ETA photo need to be?
A: Your UK ETA photo must be taken within 6 months of your application date. This ensures the photo accurately reflects your current appearance for biometric matching at UK borders. Using older photos, even if they meet all other technical requirements, will result in rejection. If your appearance has changed significantly (new hairstyle, facial hair, weight change), take a new photo even if your previous one is less than 6 months old.
Q: Is it better to take my own photo or use a professional service?
A: Both options work well if done correctly. Professional photo services (£10-20) guarantee compliance and are ideal if you’re unsure about technical requirements or don’t have proper equipment. Taking your own photo at home is free and convenient if you have a smartphone with a 12MP+ camera, good lighting, and a plain white background. The choice depends on your confidence with technology and available resources. For guidance on either approach, visit https://etauk.ae/ for detailed instructions and support.
