

Rocker patches are more than just cloth. They tell stories and show pride. These patches bring a strong style to jackets, uniforms, or club vests. You’ve probably seen them shaped like a half-moon or arc. Many bikers, sports fans, and clubs wear them with pride. Have you ever considered how these patches are made? It’s not just thread and fabric, but it’s skill and technique.
In New Zealand, an increasing number of people are seeking high-quality rocker patches. From bikers to fashion lovers, everyone wants patches that last long and look great. That’s where embroidered patches services come in. These services enable individuals to create high-quality patches for any purpose, whether large or small.
Good rocker patches are strong, clean, and detailed. A small mistake in the stitching can make the entire look appear poor. This is why using the right strategies is very important. You need the best fabric, strong thread, and the perfect cut. Above all, you need to understand the process.
This blog will show you the top techniques used by patch makers in NZ to create rocker patches that meet the highest standards. We will also examine aspects such as shapes, borders, fonts, and colours.
If you’re planning to order rocker patches, this guide will help you understand what to look for. And if you’re in the patch business, it will help you improve your work. Whether you’re in Wellington, Auckland, or anywhere else, this is your easy guide.
So let’s begin the journey of making strong, stylish, and smart rocker patches, the kind that stand out.
Why Rocker Patches Are So Popular
Patches like rocker patches NZ add style to clothes, show group names or messages, and are great for motorbike clubs, schools, and sports teams.
- Where People Use Rocker Patches Most in NZ
| Use Area | Percentage |
| Biker Clubs | 45% |
| School Events | 25% |
| Fashion/Clothing | 15% |
| Sports Teams | 10% |
| Others | 5% |
Step 1: Choose the Right Fabric
To make a strong patch, you need strong fabric. The best options are:
- Twill
Smooth and strong
- Felt
Soft but thick
- Canvas
Tough and long-lasting
- Tip: Twill is used in 60% of rocker patches in NZ.
Step 2: Create a Clean, Curved Shape
Rocker patches must be curved neatly. Use a curved ruler or digital shape. Do not freehand the curve; it can look uneven.
- Tools used:
- Digital templates
- Embroidery machines with curved design features
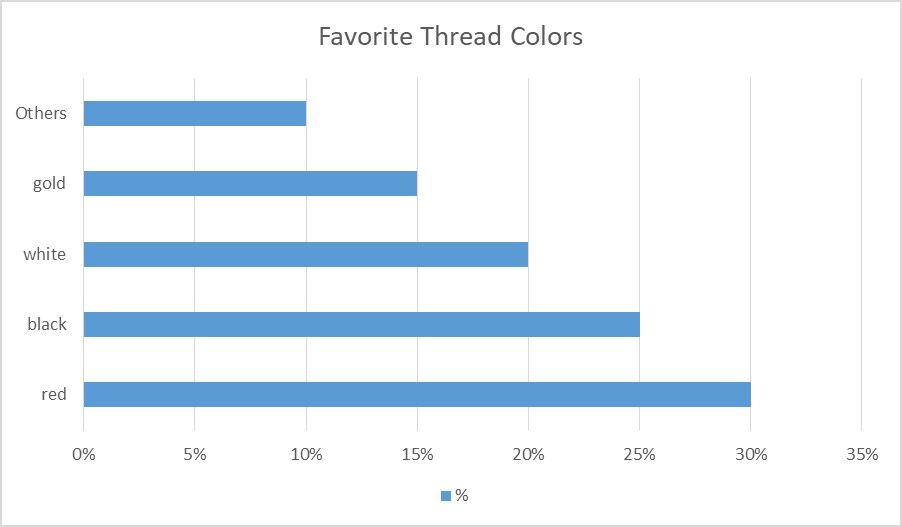
Step 3: Pick Bold Thread Colors
You want people to see your patch clearly. Use bold colors like:
- Red
- White
- Black
- Gold
- Favorite Thread Colors in NZ (Rocker Patches)
| Colors | % |
| Red | 30% |
| Black | 25% |
| White | 20% |
| Gold | 15% |
| Others | 10% |
Step 4: Choose the Right Size
Most rocker patches are 6 to 12 inches wide. If it’s for the back of a jacket, go big. If it’s for a sleeve or small bag, opt for a smaller size.
Common Sizes Used
| Item Type | Patch Size |
| Jacket Back | 10–12 inches |
| Shoulder Patch | 6–8 inches |
| Bag or Hat | 3–5 inches |
Step 5: Strong Backing for Long Life
The backing makes the patch stick well.
- Types of backing:
- Iron-on
Easy and fast
- Sew-on
Extra strong
- Velcro
Removable
- Most popular in NZ are Sew-on, which is used by 55% of people
Step 6: Clean Edges Are a Must
Edges must not fray or come loose. Use merrowed edges that have thick, stitched borders. Or use heat-cut edges that are sharp, clean, and sealed with heat.
- Fun Fact: Merrowed edges last longer and look better on round or curved patches.
Step 7: Use High-Tech Embroidery Machines
Old hand embroidery can be nice, but for rocker patches, we need machines.
- Modern machines:
- Work faster
- Make clean lines
- Handle thick fabric easily
- Machine vs. Hand Embroidery Speed
| Medium | Mins |
| Machine | 15 mins |
| Hand | 60 mins |
Step 8: Get Help from Patch Experts
If you want top quality, ask pros. There are many embroidered patches services in NZ.
- They know how to:
- Choose good fabric
- Get the curve right
- Make bold and lasting stitches
Look for trusted rocker patches NZ providers.
Step 9: Test Before You Wear
Always test the patch:
- Is it soft or itchy?
- Does it stay on after washing?
- Do the colors stay bright?
- Wash-test your patch before final use.
Step 10: Ask for Free Samples and Quotes
Good patch makers offer free quotes. Some also give free samples.
This helps you:
- Save money
- See the quality before buying
- Plan your order better
What Makes a Patch “Perfect”?
Here is a checklist that shows what makes a patch better:
- Clean curve
- Bright colors
- Strong backing
- Neat edges
- Expert stitching
If your patch has these features, it will last longer and look great.
Why Quality Checks Matter in Rocker Patches
Making good rocker patches is not just about design. It’s also about quality.
- What is Quality Control?
It means checking the patch before sending it to the customer.
- Why It’s Important
Here’s why patch quality must be checked:
- Makes sure threads are strong
- Colors are neat and don’t bleed
- Shapes are even and not bent
- No loose stitches or damage
- What Good Patch Makers Do
The best embroidered patches services in New Zealand are always:
- Look at every patch closely
- Fix any small problems
- Test patches for strength
- Benefits for You
- You get patches that last long
- No need to re-order
- Save time and money
- Look more professional
So, next time you order rocker patches NZ, ask if they conduct a quality check. It’s a small thing, but it makes a big difference!
Frequently Asked Questions
1. What is the best fabric for rocker patches?
Twill and canvas are the strongest.
2. Can I iron on my rocker patch?
Yes, if it has iron-on backing.
3. How long do these patches last?
With care, up to 5 years or more.
Final Thoughts
Rocker patches are not limited to just fashion. These emblems show your personality loudly. Designing a good patch requires proper care, excellent tools, and the right assistance. By following the above-mentioned steps, you can design emblems that last long and look cool.
Regardless of whether you are using them for fashion, fun, or any other purpose, remember that simple steps lead to better results.