
Caring for hearing aid users during earwax removal needs skill and caution. This guide gives clear steps to keep patients safe and their hearing devices protected.
Assessment Before Earwax Removal
First, gather history. Ask about ear pain, discharge, dizziness, or previous ear surgery. Also record the hearing aid make and model. Next, inspect the ear with good light and an otoscope. Note the wax amount, texture, and if there is a foreign object. If the tympanic membrane cannot be seen, pause. Also consider recent infections or a perforation. If you suspect any of these, refer to an ENT specialist. Importantly, confirm device status. Switch off hearing aids before starting. Remove earmolds when possible. Explain the steps to the patient in simple words. This reduces anxiety and improves cooperation. Finally, obtain consent. Make sure the patient understands risks and benefits. If the patient uses blood thinners, check with their doctor first. All of these steps reduce the chance of harm during the procedure.
Preparing Hearing Aids and Patients
Begin by clearing communication. Tell patients what will happen and how long it will take. Use short sentences and pause to let them ask questions. Remove behind-the-ear components when possible. Also, remove custom moulds to protect them from water or instruments. Place electronics away from the treatment area. Wrap items in clean cloth to prevent drops. For in-ear devices, consult the manufacturer’s instructions. If removal risks damage, delay removal and refer. Next, position the patient comfortably. Use a chair with good head support. Bright lighting and a steady table are helpful. Offer protective eyewear if irrigation is planned. Finally, double-check that suction and irrigation tools are working. This reduces sudden interruptions and increases safety.
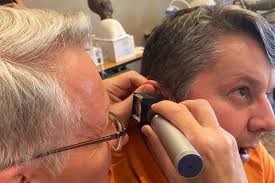
Safe Earwax Removal Techniques
When you choose a technique, match it to the wax type and patient risk. For soft, loose wax, gentle irrigation often works. For hard, impacted wax, manual removal with microsuction or curettes is better. Always proceed slowly. Stop if the patient reports pain or dizziness. Below are safe technique reminders:
- Microsuction: Use low suction pressure and a fine tip. Keep the speculum visible at all times. Move slowly and retract gently.
- Manual removal: Use a headlight and fine curettes or loops. Pull the ear slightly to straighten the canal. Avoid deep probing near the tympanic membrane.
- Irrigation: use body-temperature water or saline. Aim stream along the canal wall, not directly at the eardrum. Use low pressure and small syringe volumes.
Also, consider prophylactic measures. For example, soften hard wax for several days with drops. Use warmed drops, and re-check. Finally, never use cotton buds for removal. They push wax deeper and can harm the ear.
For more info Visit: https://excelhearing.co.uk/
Monitoring and Communication During the Procedure
Stay communicative throughout. Before starting, tell the patient you will check in regularly. Use simple cues to ensure comfort. For example, ask them to raise a hand if they feel pain. Watch for signs of distress like sudden head movement or pale skin. Also monitor balance; irrigation can cause vertigo in some patients. If vertigo appears, stop and help the patient sit still until it passes. Record sensory changes, such as new hearing loss or tinnitus. Immediately suspend the procedure if bleeding occurs. After any adverse sign, examine the ear and, if needed, refer to ENT. Finally, explain post-procedure sensations so patients know what is normal. This builds trust and reduces unnecessary alarms.
Infection Control and Hygiene
Good hygiene reduces infection risks. First, wash your hands thoroughly before and after care. Next, clean all reusable instruments using approved sterilisation methods. Also, use single-use specula when possible. For microsuction and suction tips, follow the manufacturer’s cleaning steps. If irrigation is used, use sterile saline or clean water only. Replace irrigation syringes between patients. In addition, wear gloves and protective eyewear during procedures. Dispose of single-use items safely. Below are key infection control steps:
- Hand hygiene: Wash or use sanitiser before and after patient contact.
- Instrument care: follow local sterilisation policy for each tool.
- Surface cleaning: disinfectant treatment of surfaces between patients.
Finally, document any signs of infection. If post-procedure discharge or fever appears, advise medical review. Quick action prevents complications.
Post-Procedure Checks with Hearing Aids
After wax removal, re-examine the ear with an otoscope. Confirm the tympanic membrane looks healthy. Clean any residual water and allow the ear to dry. Re-fit hearing aids carefully. Check for feedback, which may indicate residual wax or moisture. Run a listening check and a basic functional test. If possible, perform real-ear measures or objective verification. Also, advise the patient about immediate care. Tell them to avoid water entry into the ear for 24–48 hours. Recommend softening drops only if needed. If the device shows any malfunction, advise service or return to the manufacturer. Finally, schedule a follow-up call or visit. This ensures the patient recovers well and the hearing aid works correctly.
Special Populations and Risk Management
Certain patients need extra caution. For example, those with diabetes, immune suppression, or a history of ear surgery carry a higher risk. Also, children and older adults may not cooperate fully. For these groups, choose the gentlest method. Consider clinical referral if risks are high. When treating patients with cognitive impairment, use calm language and a trusted helper. For those on anticoagulants, consult the prescriber before invasive attempts. In addition, be alert to anatomical differences. Narrow canals or exostoses can limit instrument access. Document all decisions clearly. If you are unsure, consult ENT or audiology colleagues. This lowers the chance of harm.
Training, Documentation, and Follow-Up
Good teams train regularly. Clinicians should learn hands-on skills through supervised practice. For formal options, consider an Earwax Removal course to gain accreditation and confidence. Keep detailed records of every procedure. Note the method used, any complications, and device condition. Use simple templates to speed documentation. Also, plan follow-up care. Call within 48–72 hours to check symptoms. Offer rapid re-evaluation if problems arise. Finally, audit outcomes periodically. Review complication rates and patient feedback. This improves practice and builds trust.