

Picture this: you’ve just installed new flood lights around your property, expecting brilliant illumination and enhanced security. Instead, you’re left with dim patches in critical areas, a flickering light by the garage, and a nagging worry about whether those electrical connections are truly safe. Despite your investment in LED technology, something went wrong. The truth is, properly installed LED flood lights can transform your outdoor space into a secure, well-lit haven while slashing your energy bills. They’re powerful tools for deterring intruders, illuminating walkways, and showcasing your home’s architecture after dark.
The problem isn’t the technology itself—it’s that most DIY installations stumble over preventable mistakes. Homeowners skip crucial planning steps, choose fixtures without understanding key specifications, overlook electrical safety protocols, or mount lights in positions that waste their potential. These errors don’t just compromise performance; they create safety hazards, frustrate neighbors with light pollution, and turn what should be a cost-effective upgrade into an expensive do-over.
This guide walks you through the installation process with a focus on what actually matters: strategic planning, selecting genuinely weatherproof and energy-efficient fixtures, maintaining electrical safety, and positioning lights for maximum effectiveness. By avoiding these common pitfalls, you’ll achieve the security, savings, and satisfaction that LED flood lights promise.
Mistake 1: Skipping the Planning & Assessment Phase
The most critical error happens before you even pick up a tool: rushing into installation without a clear plan. Many homeowners purchase flood lights on impulse, mount them wherever an outlet exists, and wonder why the results disappoint. Effective outdoor lighting requires understanding what you’re trying to achieve and mapping out coverage areas before spending a dollar. Start by walking your property at night with a flashlight, identifying dark zones that concern you—whether that’s the driveway where packages get delivered, side gates that provide hidden access, or pathways where someone could trip. Sketch a simple property diagram noting existing light sources, power outlet locations, and areas needing illumination. Consider seasonal changes too; that tree providing shade in summer might block light differently in winter. This assessment reveals how many fixtures you actually need and where they’ll deliver maximum impact. Factor in your home’s architectural features and landscaping—you might want to highlight a beautiful facade or avoid casting shadows that create hiding spots. Taking two hours for this planning phase prevents buying the wrong quantity of lights, eliminates guesswork during installation, and ensures your lighting system works as an integrated solution rather than random bright spots that leave gaps in coverage.
Ignoring Your Specific Lighting Goals
Not all outdoor lighting serves the same purpose, and confusing these goals leads to poor fixture selection and placement. Security lighting prioritizes broad, bright coverage that eliminates hiding spots and activates motion sensors—think 2000+ lumens focused on entry points and property perimeters. Accent lighting showcases architectural details or landscaping with lower intensity and precise beam angles, creating visual interest rather than deterring intruders. Task lighting serves functional needs like illuminating stairs, work areas, or grilling stations with focused beams. Installing a powerful security flood where you need subtle accent lighting creates harsh glare and wastes energy, while placing decorative fixtures where you need serious security leaves vulnerabilities. Define your primary objective for each location before shopping, as this determines the lumen output, beam spread, and features like motion detection you’ll actually need.
Failing to Measure Light Coverage and Brightness (Lumens)
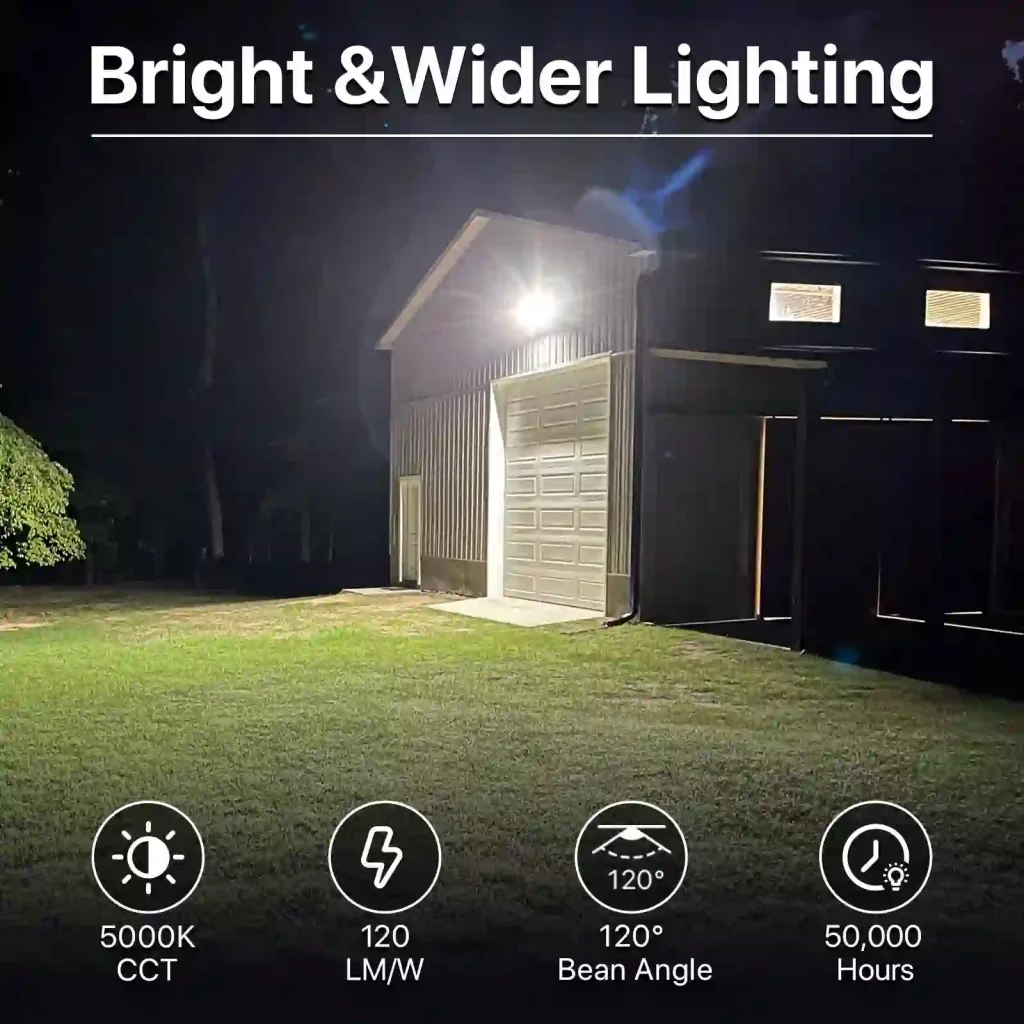
The shift from incandescent to LED technology makes wattage nearly meaningless for brightness—what matters is lumens, the actual light output measurement. A 20-watt LED can produce 2000 lumens, while an old 150-watt halogen might deliver only 1500 lumens while consuming far more electricity. Calculate your needs by measuring the area: for general security coverage, aim for 50-100 lumens per square meter. A 10-meter by 5-meter driveway (50 square meters) needs roughly 2500-5000 lumens total, which might be one powerful fixture or two moderate ones depending on placement. Underestimating creates frustrating dark spots where intruders could approach undetected, while excessive lumens waste money and annoy neighbors. Consider beam angle too—a narrow 30-degree spot concentrates light for distance, while a 120-degree flood spreads coverage wider but shorter. Matching lumens and beam spread to your measured space ensures even illumination without gaps or overlapping waste. Check manufacturer specifications for coverage area claims, but verify with your actual measurements rather than trusting marketing estimates.
Mistake 2: Choosing the Wrong LED Flood Light for the Job
Even with perfect planning, selecting an inappropriate fixture undermines your entire installation. The flood light market overwhelms shoppers with technical specifications, and many homeowners default to the cheapest option or grab whatever’s prominently displayed without verifying it matches their needs. This mistake manifests in multiple ways: purchasing indoor-rated lights that corrode within months when exposed to rain, choosing fixtures with insufficient brightness that force you to buy additional units later, or selecting color temperatures that make your property look institutional rather than inviting. The right LED flood light balances three critical factors—weatherproof durability, appropriate light output, and energy efficiency. A genuinely outdoor-rated fixture with an IP65 or higher rating withstands rain, snow, dust, and temperature fluctuations for years without maintenance. The lumen output should match your calculated coverage needs from the planning phase, whether that’s 1500 lumens for a small patio or 5000+ lumens for a large driveway. Energy efficiency becomes apparent in the lumens-per-watt ratio; quality LEDs deliver 100-130 lumens per watt, meaning a 30-watt fixture produces 3000-3900 lumens while consuming minimal electricity compared to older technologies. Don’t be swayed by vague marketing claims about “super bright” or “professional grade” without checking actual specifications. Verify the IP rating is clearly stated, compare lumens rather than watts across brands, and calculate your annual energy costs based on wattage and expected usage hours. Spending an extra twenty dollars on a properly rated, efficient fixture prevents replacing failed units annually and delivers better performance from day one. The wrong choice here doesn’t just waste money—it creates ongoing frustration and potential safety gaps in your lighting coverage.
Overlooking IP Ratings (Like IP65) for Weatherproofing
The IP (Ingress Protection) rating tells you exactly how well a fixture resists water and dust intrusion, yet many homeowners ignore this specification entirely. An IP65 rating means the fixture is completely dust-tight and protected against water jets from any direction—essential for withstanding heavy rain, snow, and humidity without internal damage. The first digit (6) indicates dust protection, while the second (5) specifies water resistance; outdoor flood lights should have at least IP65, with IP66 or IP67 offering even greater protection for coastal areas or extreme weather zones. Installing a fixture rated only for indoor use or with insufficient weatherproofing (IP44 or lower) leads to moisture infiltration that corrodes electrical components, causes flickering or failure, and creates shock hazards. Manufacturers like Led Hyperlite clearly display IP ratings on their product specifications, making it easier to verify weatherproof standards before purchase. Avoid any fixture that doesn’t clearly display this information—it’s a red flag for substandard construction that won’t survive outdoor conditions.
Prioritizing Wattage Over Lumens and Color Temperature
The energy-saving advantage of LEDs becomes meaningless if you select fixtures using outdated thinking. Wattage measures energy consumption, not brightness—a 50-watt LED produces far more light than a 150-watt incandescent while using one-third the electricity. Always compare lumens as your primary brightness metric, then check wattage to assess efficiency and calculate operating costs. A quality LED delivering 100+ lumens per watt provides superior value and performance. Color temperature, measured in Kelvin, dramatically affects how your lighting feels and functions. Cool white (5000-6500K) produces crisp, bright illumination ideal for security applications because it enhances visibility and alertness, mimicking daylight. Warm white (2700-3000K) creates a softer, more inviting ambiance better suited for entertaining areas or architectural accent lighting. Neutral white (3500-4500K) splits the difference for versatile applications. Choosing the wrong color temperature makes spaces feel unwelcoming or fails to provide the security presence you need, so match the Kelvin rating to your specific lighting goal identified during planning.
Mistake 3: Poor Electrical Preparation and Safety Oversights
Electrical work intimidates many DIY enthusiasts, and this fear often leads to dangerous shortcuts or assumptions that compromise both safety and performance. The most common oversight is treating outdoor electrical connections like indoor ones—failing to account for moisture exposure, temperature extremes, and the higher stakes of exterior installations where water and electricity intersect. Before connecting a single wire, you must verify your electrical system can support the additional load and that every connection point is properly protected against the elements. Start by turning off power at the breaker box and using a non-contact voltage tester to confirm circuits are dead before touching any wires—never assume a switch alone has cut power. Examine existing outdoor wiring for damage, corrosion, or outdated materials that need replacement before adding new fixtures. Calculate the total amperage your new lights will draw and confirm your circuit has adequate capacity; most residential circuits handle 15-20 amps, and overloading causes breaker trips or fire hazards. Use only outdoor-rated electrical boxes, conduit, and weatherproof wire connectors specifically designed for exterior exposure. Every junction must be housed in a weatherproof box with gaskets that seal out moisture, and all exposed wiring should run through UV-resistant conduit rather than being left vulnerable to sun damage and physical impact. Ground wires are non-negotiable—they provide the safety path that prevents electric shock if insulation fails. Skipping these steps to save an hour of work creates ongoing risks that far outweigh the convenience, potentially causing equipment failure, property damage, or serious injury. When in doubt about circuit capacity, wire gauge requirements, or local electrical codes, consult a licensed electrician rather than guessing. The investment in proper electrical preparation ensures your lighting system operates reliably and safely for decades.
Not Checking Existing Wiring and Circuit Capacity
Before adding flood lights to an existing circuit, verify it can handle the additional electrical load without overloading. Turn off the breaker controlling your outdoor circuits and use a non-contact voltage tester on all wires to confirm power is truly off—this inexpensive tool prevents potentially fatal shocks. Calculate your new lights’ total wattage and add it to existing loads on that circuit; if the sum exceeds 80% of the circuit’s rated capacity (typically 1440 watts for a 15-amp circuit or 1920 watts for 20-amp), you’ll need a dedicated circuit to avoid tripping breakers. Inspect existing outdoor wiring for cracked insulation, corrosion at connection points, or outdated cloth-wrapped wiring that should be replaced before connecting new fixtures. Check that wire gauge matches the circuit amperage—14-gauge for 15-amp circuits, 12-gauge for 20-amp—as undersized wiring creates fire hazards when carrying higher loads.
Neglecting Proper Grounding and Weatherproof Connections
Every outdoor electrical connection must be housed in a weatherproof junction box with a gasket-sealed cover rated for exterior use—standard indoor boxes allow moisture infiltration that causes shorts and corrosion. Use waterproof wire connectors or marine-grade heat-shrink connections rather than standard wire nuts, which can loosen with temperature cycling. Connect the ground wire from your flood light to the circuit ground wire and the metal junction box itself, creating multiple safety paths that trip breakers if faults occur rather than energizing metal parts someone might touch. Run all exposed wiring through UV-resistant PVC conduit secured with weatherproof fittings, protecting cables from sun damage, physical impact, and animal interference. Apply silicone sealant around conduit entry points and fixture mounting bases to prevent water from seeping behind installations. Test all connections with your voltage tester after installation to confirm proper wiring before restoring power at the breaker.
Mistake 4: Incorrect Mounting and Positioning
Perfect fixtures and flawless wiring mean nothing if your lights are mounted in the wrong location or aimed poorly. This mistake reveals itself immediately after installation: harsh glare blinds anyone approaching your door, security cameras wash out from direct light exposure, or critical areas remain shadowed despite having fixtures nearby. Proper positioning requires thinking three-dimensionally about how light travels and spreads from its source. Mount fixtures too low and you create easy targets for vandalism while limiting coverage area; mount them too high and the beam disperses before reaching ground level where intruders actually move. Angle matters equally—a flood light aimed straight down wastes half its potential coverage, while one tilted too far horizontally blasts neighbors’ windows and violates light trespass ordinances in many communities. Walk your property during installation with the fixture temporarily positioned, testing different heights and angles before drilling final mounting holes. Observe how shadows fall, whether the beam covers your intended area without spilling excessively beyond property lines, and if the light enhances or interferes with security cameras. Consider seasonal foliage changes that might block beams in summer or allow excessive spread in winter. Adjustable mounting brackets provide flexibility to fine-tune positioning after installation, compensating for factors you couldn’t anticipate during planning. This deliberate approach to physical placement transforms adequate lighting into truly effective illumination that serves its purpose without creating new problems.
Mounting at the Wrong Height and Angle
For security flood lights covering driveways, yards, or entry points, mount fixtures 9-12 feet high—high enough to prevent tampering but low enough to maintain beam intensity at ground level where motion occurs. Position the fixture so its center beam aims at a point roughly two-thirds the distance to your coverage area’s far edge; this creates even illumination from near to far rather than a bright spot directly below with darkness beyond. A 30-40 degree downward angle from horizontal typically provides optimal coverage without excessive glare. For accent lighting on architectural features, mount closer to the target (3-6 feet away) with narrower beam angles that highlight specific elements. Test positioning before permanently securing brackets—have someone hold the fixture while you observe coverage from multiple vantage points, including where people naturally approach your property. Avoid aiming lights directly at security cameras, which causes lens flare and washed-out footage; instead, position fixtures to illuminate the area the camera monitors without shining into the lens itself.
Creating Light Trespass and Glare for Neighbors
Your security needs don’t justify flooding neighbors’ bedrooms with unwanted light. Light trespass—spillage beyond your property boundaries—damages relationships and may violate local ordinances. Use fixtures with built-in shields, louvers, or hoods that direct light downward and outward within your property lines rather than allowing uncontrolled spread. Mount lights on sides of structures facing your yard rather than pointing toward neighboring homes. Consider motion-activated fixtures for perimeter areas, providing security when needed without constant intrusion. If your lighting plan requires coverage near property lines, choose narrower beam angles (30-60 degrees) that concentrate light precisely where needed rather than wide floods that scatter everywhere. A simple test: stand where your neighbor’s windows are and observe if your fixture creates uncomfortable brightness—if it bothers you from that position, it will certainly bother them nightly.
Achieving Reliable Outdoor Illumination
Successfully installing LED flood lights comes down to avoiding four preventable mistakes: skipping thorough planning that identifies your specific lighting goals and coverage needs, selecting fixtures without verifying IP65 weatherproof ratings and appropriate lumen output, overlooking electrical safety protocols that protect your home and family, and mounting lights without considering height, angle, and neighbor impact. Each mistake compounds the others—poor planning leads to wrong fixture choices, which electrical shortcuts can’t compensate for, and improper positioning wastes whatever potential remains. Master these fundamentals and you’ll achieve the security, energy savings, and reliability that make LED flood lights such a valuable investment.
The homeowners who succeed with outdoor lighting aren’t necessarily more skilled—they’re simply more deliberate. They measure coverage areas before shopping, compare lumens and IP ratings instead of grabbing whatever’s cheapest, verify electrical capacity before connecting wires, and test positioning before drilling permanent holes. This methodical approach transforms LED flood lights from frustrating experiments into powerful tools that deter intruders, eliminate dark zones, and slash energy costs for decades. Your property deserves lighting that actually works, and you now have the knowledge to make that happen. Take the time to plan properly, choose quality weatherproof fixtures, prioritize safety in every electrical connection, and position lights thoughtfully. The result will be outdoor illumination that delivers exactly what you need, night after night, year after year.